Gluten Free Slow Roasted Chicken: An Easy One Pot Meal

Welcome to the first recipe in my new fall series, how to make the most from your roast chicken.

Today I’m teaching you how to make a gluten free slow roasted chicken with crispy skin and juicy meat, all in one pot. This is one of the base recipes for so many of the meals I make for my family as soon as the weather starts getting cold. You’ll catch me roasting a few chickens at a time so that I can make bone broth, soups, sandwiches, pot pies, you name it. This recipe is not an exact science, it’s more of a learning how to, where I’m going to give you the basics, tell you my secrets and let you make it your own.
This method is pretty much fail proof. So let’s get started. Jump to
Building the vegetable base
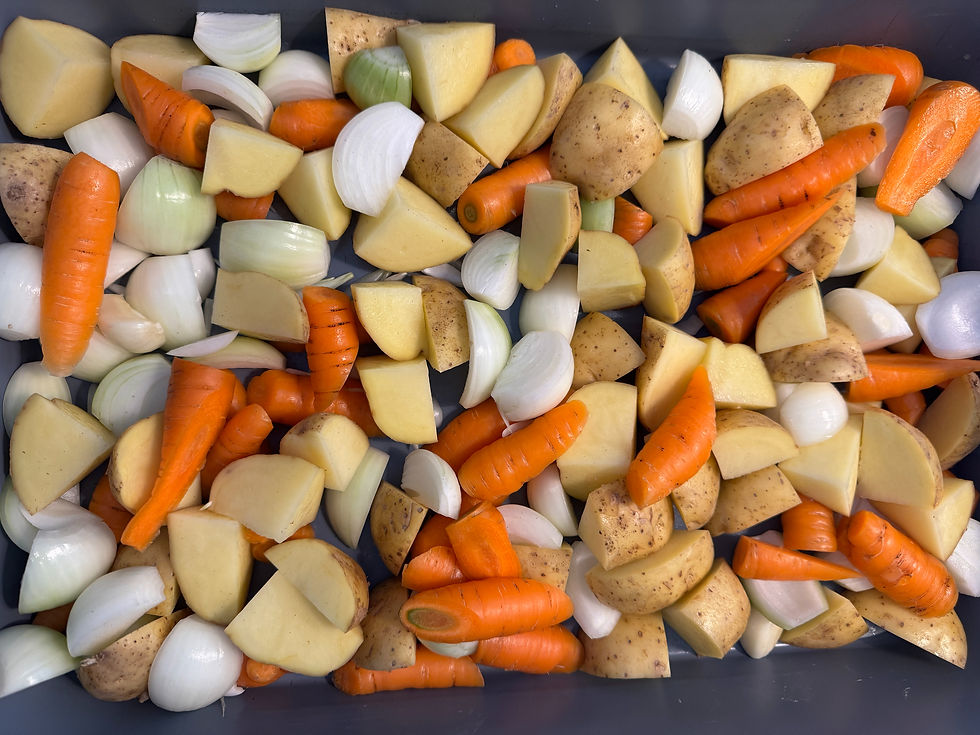
No matter how many chickens you’re roasting, you want to start by filling your roasting pan with a full bed of root veggies, think carrots or parsnip, onions and celery, potatoes or sweet potatoes for a starch, turnips, you get the drift!
You’re looking to fill the base of your roasting pan with 1/3 of potatoes, 1/3 of veggies and the last 1/3 with onions. I don’t want to see the base of your roasting pan, so when in doubt…add more. Also don’t forget to throw in a few cloves of garlic and a couple bay leaves.
How much liquid to add to your roasting pan
Then you want to submerge your veggies in liquid. Every roasting pan will need a different amount of liquid; rule of thumb, you want your veggies to be just on the verge of floating so that you can comfortably sit the chicken on top and not have its butt swimming in a warm bath.
Now what liquids do I use? I use a mix of bone broth, leftover pan juices from my last roast chicken, and then add water until I get the right level.
For the bone broth, I make my own and will show you how to make yours in an upcoming article, but for today, you can use regular store bought chicken broth. I do recommend using a low salt option, not because we’re restricting, just because we’re going to be adding so much flavour in the next steps and I would hate for you to end up with overly salty pan juices that overpower everything in the end.

The secret to a rich and flavourful pan sauce
The ‘sauce’… we’re going to be basting the chicken with it and using up the leftovers to make more meals so we’re going to add so much flavour to your pan juices to get the most out of it.
Start with setting aside a portion of the leftover pan juices and freeze it to use next time. This adds so much more depth to your next juices because you’re building on those flavours over time. I know you don’t have juices this time around but don’t stress it. The base of this pan sauce is still perfectly flavourful the first time around.
Typically, chicken recipes require chicken broths but here’s where I go a little different.
I add a big squirt of liquid concentrated veggie broth and a beef bouillon cube.
That’s also why I recommend a low sodium or no salt chicken broth cause these two products hold their weight in salt.
Next, you’re ready to set your chicken on top of your bed of veggies breast side up.
How to season roast chicken
Now it’s time to season your chicken and this is where most people go wrong. They under season. My tip for seasoning be generous, and I mean I want a blanket of spices on this chicken! You’re going to be basting this chicken, so every time you baste it, seasonings trickle down into your pan instead of staying on the skin. So do it generously!!
To season, instead of salt and pepper grab your Montreal steak spice blend. Then, grab your favourite spices, think parsley, basil, thyme or even a premade fine herb blend would do great. I like adding some paprika for that BBQ chicken feel.
The most important ingredient
You’d think it was the chicken, but no. What makes this chicken and pan sauce extra delicious is the onion soup mix you’re going to drizzle onto your chicken and then dump the rest of the packet into your roasting pan. Always check that yours is gluten free.
See how well my chicken is coated? That’s what you want.

Why roast chicken for 3 hours at 350°F?
Now that everything is seasoned, all this is going in the oven for three hours at 350°F.
This is really important. You might be thinking, come on, a chicken only takes an hour, an hour and a half to cook. But if you want a roast chicken that falls off the bone and is juicy and has a beautifully crispy skin, trust me. You want three hours at 350°F!
How often should you baste a roast chicken?
You want to baste your chicken every 30 minutes with the pan juices. Keep an eye on your liquid level. You don’t want it to run dry. Your sauce needs time to simmer so all the flavours come together. If you see the levels getting too low, I’m talking veggies have soaked up all the liquids and you’re left with barely half an inch of liquid, add water. But generally speaking, if you made sure your veggies were just shy of floating, the chicken will release extra juices, and your levels should stay reasonable.
Side note: we’re a family that loves the skin, so if you want nice crispy skin, stop basting with an hour left. If you’re someone who just pulls the skin off and chucks it, go ahead and keep basting through that last hour too.
There you have it
Once that 3 hour mark is up, remove your chicken from the oven and let it rest on the counter for 15 minutes. This helps the chicken keep all its moisture. Slice and serve, with your roasting pan veggies and potatoes, drizzle everything with that sauce and voilà! A delicious one pot meal! Bon appétit!

Leftovers
Not a fan of leftovers? Let me change that. Stay tuned for upcoming recipes in this series, how to make the most from your roast chicken. I’ll be sharing my personal favourite, gluten free chicken pot pie filling made from leftovers, plus a very simple bone broth and a few extra ideas.
Want to be kept in the loop? Follow me on Instagram for more behind the scenes content or join my newsletter to get new articles as they get published.
Recipe
Gluten Free Slow Roasted Chicken: An Easy One Pot Meal
Juicy, fall off the bone chicken with crispy skin, roasted low and slow over a bed of root vegetables in a rich pan sauce. Everything cooks in one pot, and the leftovers set you up for so many more possibilities.
Prep time: 20 minutes
Cook time: 3 hours
Rest time: 15 minutes
Total time: 3 hours 35 minutes
Servings: 4 to 6
Keywords: gluten free roast chicken, slow roasted chicken, one pot chicken and vegetables, crispy skin roast chicken
Ingredients
Vegetable base
Yellow onions cut in four
Carrots or parsnips, cut in large chunks
Celery stalks, cut in large chunks
Potatoes, halved or cut into large chunks
Garlic cloves
Bay leaves
Pan sauce
Chicken broth, gluten free, as needed
Leftover pan juices from your last roast chicken, if you have them
1-2 tbsp liquid vegetable broth concentrate, gluten free
1-2 beef bouillon cubes, gluten free
Water, as needed
Chicken and seasoning
1 whole chicken
Montreal steak spice, gluten free
Paprika
Dried herbs such as parsley, thyme, basil or a fine herb blend blend
1 packet gluten free onion soup mix
Instructions
Preheat the oven to 350°F (175°C).
Build the vegetable base. Fill your roasting pan with a full bed of vegetables: about one third onions, one third carrots and celery, and one third potatoes. You shouldn’t be able to see the bottom of the pan. When in doubt, add more. Add garlic cloves and bay leaves.
Add the liquid. Pour in the chicken broth and any leftover pan juices. Add the vegetable broth concentrate and crumble in the beef bouillon cube(s). Top up with water until the vegetables are just about to float.
Place the chicken. Set your chicken breast side up on top of the vegetables.
Season generously. Generously cover the chicken with Montreal steak spice, paprika and herbs. Don’t add salt or pepper, since the steak spice takes care of that.
Add the onion soup mix. Sprinkle the onion soup mix over the chicken, then pour the rest of the packet into the pan.
Roast for 3 hours at 350°F. Baste every 30 minutes with the pan sauce. If the liquid drops below about half an inch, add water.
For crispy skin, stop basting with 1 hour left. If you don’t eat the skin, keep basting until the end.
Check that it’s done. The thickest part of the thigh should read at least 82°C (180°F).
Rest and serve. Let the chicken rest for 15 minutes, then slice. Serve it with the vegetables and potatoes, and spoon the pan sauce over everything.
Notes
Roasting more than one chicken: use a larger pan and keep the same thirds ratio for the vegetables. The time and temperature don’t change.
Save the pan juices: freeze a portion for your next roast chicken. The flavour gets deeper every time.
Celiac safe: check the labels on the chicken broth, the bouillon cube, the vegetable concentrate, the spices and the onion soup mix, because all of these can contain wheat or barley.
Leftovers: keep the carcass for bone broth and any other leftovers for my pot pie filling, both coming up next in this series.
Commentaires